目录
Spring学习笔记 - IOC
写在前面
正式学习java代码审计,首先学习spring框架的一些思想和编程方法,这里记录一下自己的学习历程,希望师傅们能够指出不足
IOC
IOC(控制反转:InverseofControl ) ,又称作 依赖注入,是一种重要的面向对象编程的法则,用来削减计算机程序耦合问题,也是轻量级的 Spring 框架的核心。
IOC不是一种技术而是一种思想,在Java开发中,IOC意味着将设计好的对象交给容器去控制,不是传统意义上那种在对象内部控制。这句很好理解,举个例子:
有两个类分别为ZhangSan.java和LiSi.java,这两个类中存在同样的test方法,如下:
public void test(){
        System.out.println("张三 - 测试员工");
}存在另一个类,为JavaWork,有个doTest方法,该方法调用ZhangSan.java和LiSi.java的test方法,内容如下:
public void doTest(){
        ZhangSan zhangsan = new ZhangSan();
        zhangsan.test();
    }
这时候,存在主函数,内容如下:
public static void main(String[] args) {
        JavaWork javawork = new JavaWork();
        javawork.setTester(new LiSi());
        javawork.doTest();
    }
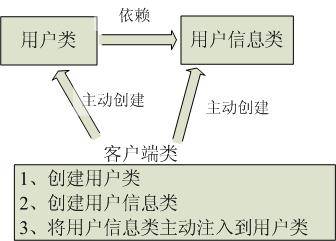
可以发现,这种方法就是传统意义上那种在对象内部控制,其流程如下所示:

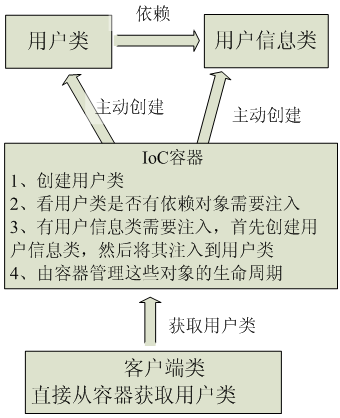
而IOC是如何控制的呢?如下图

拿上诉例子来说,如果利用IOC进行控制,那么可以引入Spring配置文件beans.xml,一个标准的beans.xml文件如下所示:
<beans xmlns="http://www.springframework.org/schema/beans"
    xmlns:xsi="http://www.w3.org/2001/XMLSchema-instance"
    xsi:schemaLocation="http://www.springframework.org/schema/beans
        http://www.springframework.org/schema/beans/spring-beans.xsd">
</beans>
相关解释:
- 【xmlns="http://www.springframework.org/schema/beans"】
声明xml文件默认的命名空间,表示未使用其他命名空间的所有标签的默认命名空间。
- 【xmlns:xsi="http://www.w3.org/2001/XMLSchema-instance"】
声明XML Schema实例,声明后就可以使用schemaLocation属性。
- 【xsi:schemaLocation="http://www.springframework.org/schema/beans http://www.springframework.org/schema/beans/spring-beans.xsd】
指定Schema的位置。这个属性必须结合命名空间使用。
这个属性有两个值,第一个值表示需要使用的命名空间。第二个值表示供命名空间使用的XML schema的位置。
利用IOC的思想,可以定义beans.xml内容如下:
<beans xmlns="http://www.springframework.org/schema/beans"
    xmlns:xsi="http://www.w3.org/2001/XMLSchema-instance"
    xsi:schemaLocation="http://www.springframework.org/schema/beans
        http://www.springframework.org/schema/beans/spring-beans.xsd">

    <bean id="zhangsan" class="com.java001.service.ZhangSan"></bean>
    <bean id="lisi" class="com.java001.service.LiSi"></bean>
    <bean id="javawork" class="com.java001.service.JavaWork">
        <property name="tester" ref="zhangsan"></property>
    </bean>

</beans>可以看到,我们只需要修改配置文件中的<property name="tester" ref="zhangsan"></property>即可控制要调用的类,而不需要修改在对象内部进行控制。
配置定义好后,修改main函数如下:
public static void main(String[] args) {
        ApplicationContext ac = new ClassPathXmlApplicationContext("beans.xml");
        JavaWork javawork = (JavaWork)ac.getBean("javawork");
        javawork.doTest();
}引用该xml配置文件,调用doTest方法,不需要在javawork.setTester(new LiSi());中修改想要调用的对象。
依赖注入
谈依赖注入可以先说下依赖,什么是依赖呢?简单的说,依赖是一种关系,一个类依赖另一个类,也就是一个类中有另一个类的引用,class People中有class Dog的引用那就叫 People对Dog有一个依赖。如下代码:
class People{
     Dog dog;
     public People(){
         dog = new Dog();
     }
}
再来说下依赖注入,我们一开始学java对于上面的构造方法里面我们如何给dog引用对象?
我们的第一反应肯定是 new 一个对象,这也就是我们的习惯思维,调用者来创建被调用者的实例,而在依赖注入的思想里,我们不是直接 new 对象了,而是通过传递外部引用,也就是通过外部注入依赖。这也是依赖注入的思想,依赖注入主要作用就是其能够让相互协作的软件组件保持松散耦合。土话说就是不要修改相关类中的代码,直接传入相关值就行。
这里简单介绍三种依赖注入,属性注入,构造函数注入,工厂方法注入,至于泛型依赖注入,后面学到再介绍吧。
有两个类,分别为People.java和Dog.java,内容分别如下:
package com.java002.entity;

public class People {

    private int id;
    private String name;
    private int age;


    public People() {
        super();
        // TODO Auto-generated constructor stub
    }

    public People(int id, String name, int age) {
        super();
        this.id = id;
        this.name = name;
        this.age = age;
    }

    public int getId() {
        return id;
    }
    public void setId(int id) {
        this.id = id;
    }
    public String getName() {
        return name;
    }
    public void setName(String name) {
        this.name = name;
    }
    public int getAge() {
        return age;
    }
    public void setAge(int age) {
        this.age = age;
    }

    @Override
    public String toString() {
        return "People [id=" + id + ", name=" + name + ", age=" + age + "]";
    }


}
package com.java002.entity;

public class Dog {

    private String name;

    public String getName() {
        return name;
    }

    public void setName(String name) {
        this.name = name;
    }


}
主函数如下:
    public static void main(String[] args) {
        ApplicationContext ac = new ClassPathXmlApplicationContext("beans.xml");
        People people = (People)ac.getBean("people");
        System.out.println(people);
    }
属性注入
beans.xml配置如下:
<beans xmlns="http://www.springframework.org/schema/beans"
    xmlns:xsi="http://www.w3.org/2001/XMLSchema-instance"
    xsi:schemaLocation="http://www.springframework.org/schema/beans
        http://www.springframework.org/schema/beans/spring-beans.xsd">

    <bean id="people2" class="com.java002.entity.People">
    <property name="id" value="2"></property>
    <property name="name" value="李二"></property>
    <property name="age" value="22"></property>
    </bean>

</beans>
主函数修改如下:
public static void main(String[] args) {
        ApplicationContext ac = new ClassPathXmlApplicationContext("beans.xml");
        People people = (People)ac.getBean("people");
        System.out.println(people);

        //属性注入
        People people2 = (People)ac.getBean("people2");
        System.out.println(people2);
}
构造函数注入
构造函数注入有三种类型,分别是通过类型的构造函数注入,通过索引的构造函数注入,通过联合使用的构造函数注入。
通过类型
beans.xml配置如下:
<beans xmlns="http://www.springframework.org/schema/beans"
    xmlns:xsi="http://www.w3.org/2001/XMLSchema-instance"
    xsi:schemaLocation="http://www.springframework.org/schema/beans
        http://www.springframework.org/schema/beans/spring-beans.xsd">

    <bean id="people3" class="com.java002.entity.People">
        <constructor-arg type="int" value="3"></constructor-arg>
        <constructor-arg type="String" value="三三"></constructor-arg>
        <constructor-arg type="int" value="33"></constructor-arg>
    </bean>

</beans>
主函数修改如下:
    public static void main(String[] args) {
        ApplicationContext ac = new ClassPathXmlApplicationContext("beans.xml");
        People people = (People)ac.getBean("people");
        System.out.println(people);

        //构造方法注入
        People people3 = (People)ac.getBean("people3");
        System.out.println(people3);
    }
通过索引
beans.xml配置如下:
<beans xmlns="http://www.springframework.org/schema/beans"
    xmlns:xsi="http://www.w3.org/2001/XMLSchema-instance"
    xsi:schemaLocation="http://www.springframework.org/schema/beans
        http://www.springframework.org/schema/beans/spring-beans.xsd">

    <bean id="people4" class="com.java002.entity.People">
        <constructor-arg index="0" value="4"></constructor-arg>
        <constructor-arg index="1" value="赵四"></constructor-arg>
        <constructor-arg index="2" value="44"></constructor-arg>
    </bean>

</beans>
主函数修改如下:
    public static void main(String[] args) {
        ApplicationContext ac = new ClassPathXmlApplicationContext("beans.xml");
        People people = (People)ac.getBean("people");
        System.out.println(people);

        //索引方法注入
        People people4 = (People)ac.getBean("people4");
        System.out.println(people4);
    }
类型索引联合使用
beans.xml配置如下:
<beans xmlns="http://www.springframework.org/schema/beans"
    xmlns:xsi="http://www.w3.org/2001/XMLSchema-instance"
    xsi:schemaLocation="http://www.springframework.org/schema/beans
        http://www.springframework.org/schema/beans/spring-beans.xsd">

    <bean id="people3_4" class="com.java002.entity.People">
        <constructor-arg index="0"  type="int" value="4"></constructor-arg>
        <constructor-arg index="1"  type="String" value="赵四"></constructor-arg>
        <constructor-arg index="2"  type="int" value="44"></constructor-arg>
    </bean>
</beans>
主函数修改如下:
    public static void main(String[] args) {
        ApplicationContext ac = new ClassPathXmlApplicationContext("beans.xml");
        People people = (People)ac.getBean("people");
        System.out.println(people);

        //联合方法注入
        People people3_4 = (People)ac.getBean("people3_4");
        System.out.println(people3_4);
    }
工厂方法注入
工厂方法同样分为非静态和静态方法注入
非静态
新建一个工厂类PeopleFactory.java,内容如下:
public class PeopleFactory {

    public People createPeople(){

        People p = new People();
        p.setId(5);
        p.setName("小五");
        p.setAge(55);
        return p;
    }

}beans.xml配置如下:
<beans xmlns="http://www.springframework.org/schema/beans"
    xmlns:xsi="http://www.w3.org/2001/XMLSchema-instance"
    xsi:schemaLocation="http://www.springframework.org/schema/beans
        http://www.springframework.org/schema/beans/spring-beans.xsd">

    <bean id="peoplefactory" class="com.java002.factory.PeopleFactory"></bean>
    <bean id="people5" factory-bean="peoplefactory" factory-method="createPeople"></bean>

</beans>
主函数修改如下:
    public static void main(String[] args) {
        ApplicationContext ac = new ClassPathXmlApplicationContext("beans.xml");
        People people = (People)ac.getBean("people");
        System.out.println(people);

        //工厂方法注入(非静态)
        People people5 = (People)ac.getBean("people5");
        System.out.println(people5);
    }
静态
新建一个工厂类PeopleFactory2.java,内容如下:
public class PeopleFactory2 {

    public static People createPeople(){

        People p = new People();
        p.setId(6);
        p.setName("六六");
        p.setAge(66);
        return p;
    }
}beans.xml配置如下:
<beans xmlns="http://www.springframework.org/schema/beans"
    xmlns:xsi="http://www.w3.org/2001/XMLSchema-instance"
    xsi:schemaLocation="http://www.springframework.org/schema/beans
        http://www.springframework.org/schema/beans/spring-beans.xsd">

        <bean id="people6" class="com.java002.factory.PeopleFactory2" factory-method="createPeople"></bean>

</beans>
主函数修改如下:
    public static void main(String[] args) {
        ApplicationContext ac = new ClassPathXmlApplicationContext("beans.xml");
        People people = (People)ac.getBean("people");
        System.out.println(people);

        //工厂方法注入(静态)
        People people6 = (People)ac.getBean("people6");
        System.out.println(people6);
    }
参考
https://www.iteye.com/blog/jinnianshilongnian-1413846
https://blog.csdn.net/carson0408/article/details/79019400
https://baijiahao.baidu.com/s?id=1612405553596190826&wfr=spider&for=pc
 panda
panda 

暂时无法评论哦~
暂无评论